blog hello artwork press
Showing posts with label Tutorials. Show all posts

October 6, 2011

Mini-Backyard Moss Terrarium

Terra (earth) Arium (enclosure for safe keeping)

I grew up on an island where Summers' were endless. Now living in the Northeast, the leaves are starting to change colors and winter is approaching. So, before the greenery fades I'm bringing a piece of summer indoors via a terrarium.

Supplies:
glass container
pebbles, sand or gravel for drainage
activated charcoal to keep air and water filtered and fresh
dirt or potting soil
moss

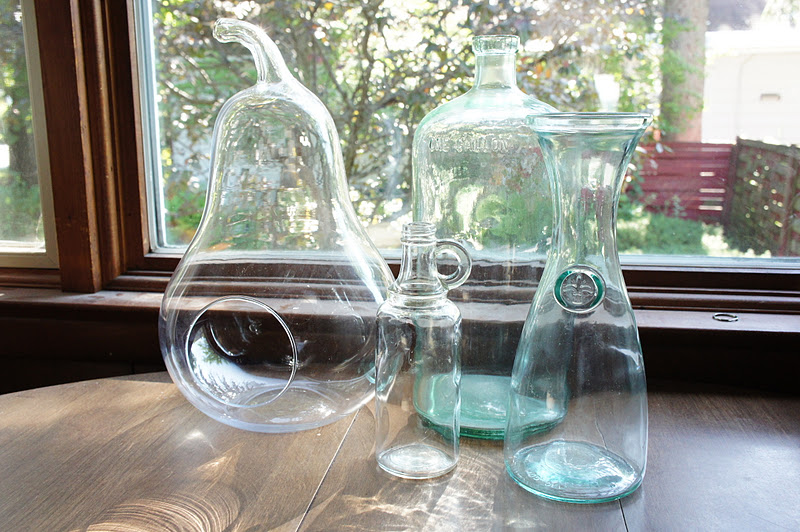
1. Find a glass container you like. I used the pear shaped one with the wide opening because I didn't have any activated charcoal on hand (hopefully with some air circulation no rotting will occur). 

2. "All good things are wild, and free." Well, not a plane ticket to Italy. But you know what I mean.  Gather small rocks, I found some in our backyard. :) Then, wash and let dry.  Layer 1-3 inches to allow drainage.

3. Add a thin layer of activated charcoal if making an enclosed terrarium. Next, add soil/dirt. 


4. Go for a nice walk and look in damp, shady areas for moss.  Gently scrape it from the surface and arrange it over the layer of dirt. I used moss growing on our patio. My husband wants to remove it but he knows I love it. I'll hold on to any piece of wild growing in concrete suburbia!


4. Mist with water daily to keep moist and place in indirect sunlight. For an enclosed terrarium, don't add too much water because it creates it's own self-sustained watering system through evaporation and condensation.

Basic How-To's by Terrarium Man

Fun terrariums at Apartment Therapy


August 23, 2011

Upside Down Plant in a Pant

DIY Hanging Planter

plant in a pant, an attempt at upside down growing. 


supplies: {1}some sort of container you can cut or drill a hole into. larger the container, the more room for your plant to grow. you can use milk jugs, plastic bottles, etc... i reused pots that came with the hydrangea's we planted this spring. {2} rope of any kind...i used piping cord. {3} coffee filter. {4}plant(s). i grew Tomatoes on bottom and Morning Glory above. {5} PANTS!


first, fit pot in plant leg. mark where top and bottom hit. add about an inch to the top, for a .5 inch double hem. 


 then, add half the diameter of bottom side of pot, plus 1 inch for hem, and minus about .75 inches (for opening that plant grows comfortably through).


DRAWSTRING: cut a hole in your double hem and pull your rope through it. use a safety pin attached to one end of rope to help guide it through the hem pocket.


attach sturdy handles. 

cut hole at center, about 3 inches in diameter.


 tighten drawstring at bottom


cut coffee filter halfway, to its middle. the filter will hold dirt in place but will allow the stem to grow wider.


wrap filter around base of plant. 


carefully run the greens through bottom opening. fill rest of pot with soil and hang!

August 17, 2011

DIY Pinch Pleat Curtains


Unlined Muslin Curtain Tutorial


 the windows before the curtains were put up. oh what a difference fabric makes! i used about 10 yards of white muslin, 109" width. 

first step--measure,measure,measure. use diagram(above) to help determine how much fabric will be needed for each curtain panel. each panel is a straightforward rectangle that is pleated at the top. since muslin tears straight along it's width and length, the easiest way to 'cut' the pattern is to NOT cut it at all.  simply snip at measurements and tear.


start with your rectangular pattern. hem all sides. 1.5 inch double hem on top and bottom. 1 inch double hem on the sides. (double hem: fold fabric two times at equal lengths)


after hemming all four sides, mark top of panel to indicate where pleats will be sewn. i used 6 inch pleats, folded at every one inch, with 5 inches spaced between. after you make your marks, hand sew each pleat. ahhh, it sounds so repetitive i know!


EDGE PLEAT

view from top
fold like an accordion at every one inch mark.


back view
flip curtain back side facing you, run needle through back/bottom (at the line where hem is sewn) two times, then knot.


back view
run needle the same way through the back/top, then knot.


front view
flip curtain over, front facing. do the same for the bottom/front.


MIDDLE PLEATS
top view
front view
back view
do an accordion fold, again. then, flip over so back of curtain is facing you.


back view
run needle through back/bottom two times, then knot

back view
 do the same for back/top


front view
flip curtain front side facing you, sew front/bottom

 leave front/top alone so it fans out like this.


once you're done with pleats, clip on some rings..and they're ready to be hung!

July 23, 2011

Onesie Name Banner

Ruffle Bum Onesie Tutorial

my husband's mother has three sisters and between the four of them they've had a total of 17 boys!! this tradition continued on into the next generation with the birth of my son. 

but at last {!sound the trumpets!}, a baby girl!


this is the beautiful misty and her mama...she's my sister-in-law...and always wins at anything she's challenged to...it really peeves the boys ;) it's only appropriate that she has the FIRST girl! so for her baby shower i made a onesie banner...with RUFFLES!
   
supplies: iron on fabric adhesive, various fabric, 2 pack of plain onesies, x-acto knife, scissors, disappearing ink pen, iron


first, peel off appropriate side of adhesive and iron on to fabric

lay out onesies and mix and match fabric until you see an arrangement that you like.

cut out letters...peel off paper behind ironed on adhesive...then align letter and iron on to onesie. 

M a D e i n E

i made acronyms for her name... you don't have to do this as it will take much longer. but they're fun so why not! use disappearing ink fabric pen to write onto left over fabric with adhesive ironed on to it. do the same as you would with the larger letters. use an x-acto and scissors to cut around word...i used mostly scissors for the curvy areas and an x-acto for the letters with holes in the middle (a, e, b, d, o) remove backing, iron onto onesie.

cut 3 inch strips of fabric for ruffles

fold in half, press.

sew ruffles..the highest tension didn't ruffle these (does anyone know why?? still have so much to learn!) so i just did long stitches with the machine then pulled on one thread to gather the ruffles

fold raw edge of corner inwards and sew.

use disappearing ink to mark where ruffles are to be sewn. 

see the scraggly fabric threads....pull on them and take them off. keep doing that until the edge is evenly fuzzy. 

then POW! they're ready to be hung!


miracle
awesome
dynamite
exuberant
loved
itsy bitsy
nifty
enchanting